Vsync
Vsync distributes large game builds without downloading the entire build every time. It divides files into content-addressed chunks, reuses chunks already on your machine, and downloads only what changed.
Choose the guide that matches what you need to do:
- Get a build: follow the desktop quick start or set up the command-line client.
- Publish builds: use the desktop Commit page
or
vsync commit. - Set up a team: follow Install and configure a server.
- Manage a server: open the admin panel.
Your Vsync administrator provides the server address, access method, game name, and platform names used by your team.
How Vsync works
You only need a few concepts to use Vsync effectively.
Builds
A build is an immutable snapshot of a directory, registered into a game. Each
build has a short ID like #42, and can also carry a human-readable version,
source revision, build configuration, notes, and status flags.
Under the hood the snapshot's bytes are addressed by a content ID derived from the directory's contents, so identical directories transfer nothing twice - even when several builds are registered from the same contents.
Games and platforms
One server can host several games. Each build belongs to one game and one
platform. Platforms are a fixed set: win64, linux, macos, ps4, ps5,
xboxone, xsx, and switch.
Streams
A stream is a named line of builds within a game, such as nightly, release,
or qa. You create it before it can be used, and a build joins it when it is
committed - each build belongs to one stream, or to none.
A stream spans platforms: its tip for a platform is simply the newest build of that platform in it. Fetching a stream gets that tip; fetching a build ID always gets that exact immutable build.
Deleting a stream asks what to do with its builds: keep them (they leave the stream and age out under the normal retention rules) or delete them with it.
Cache and checkouts
The local cache stores chunks and manifests that can be reused by future builds. A checkout is a normal directory containing a materialized build that you can run, copy, or inspect.
Deleting cached chunks does not delete checkouts. Deleting a checkout does not necessarily remove its chunks from the cache.
Deduplication
Before transferring a build, Vsync asks which chunks the destination already has. Only missing chunks cross the network. Updating a checkout is staged and then swapped into place, so cancellation or failure leaves the previous build intact.
Desktop quick start
You need an invite link and the server address from your Vsync administrator.
1. Install Vsync
Download and install the desktop app for your operating system from the Vsync downloads page. See Install Vsync for platform-specific steps.
2. Activate your account
Open your invite link, choose a password, then launch Vsync.
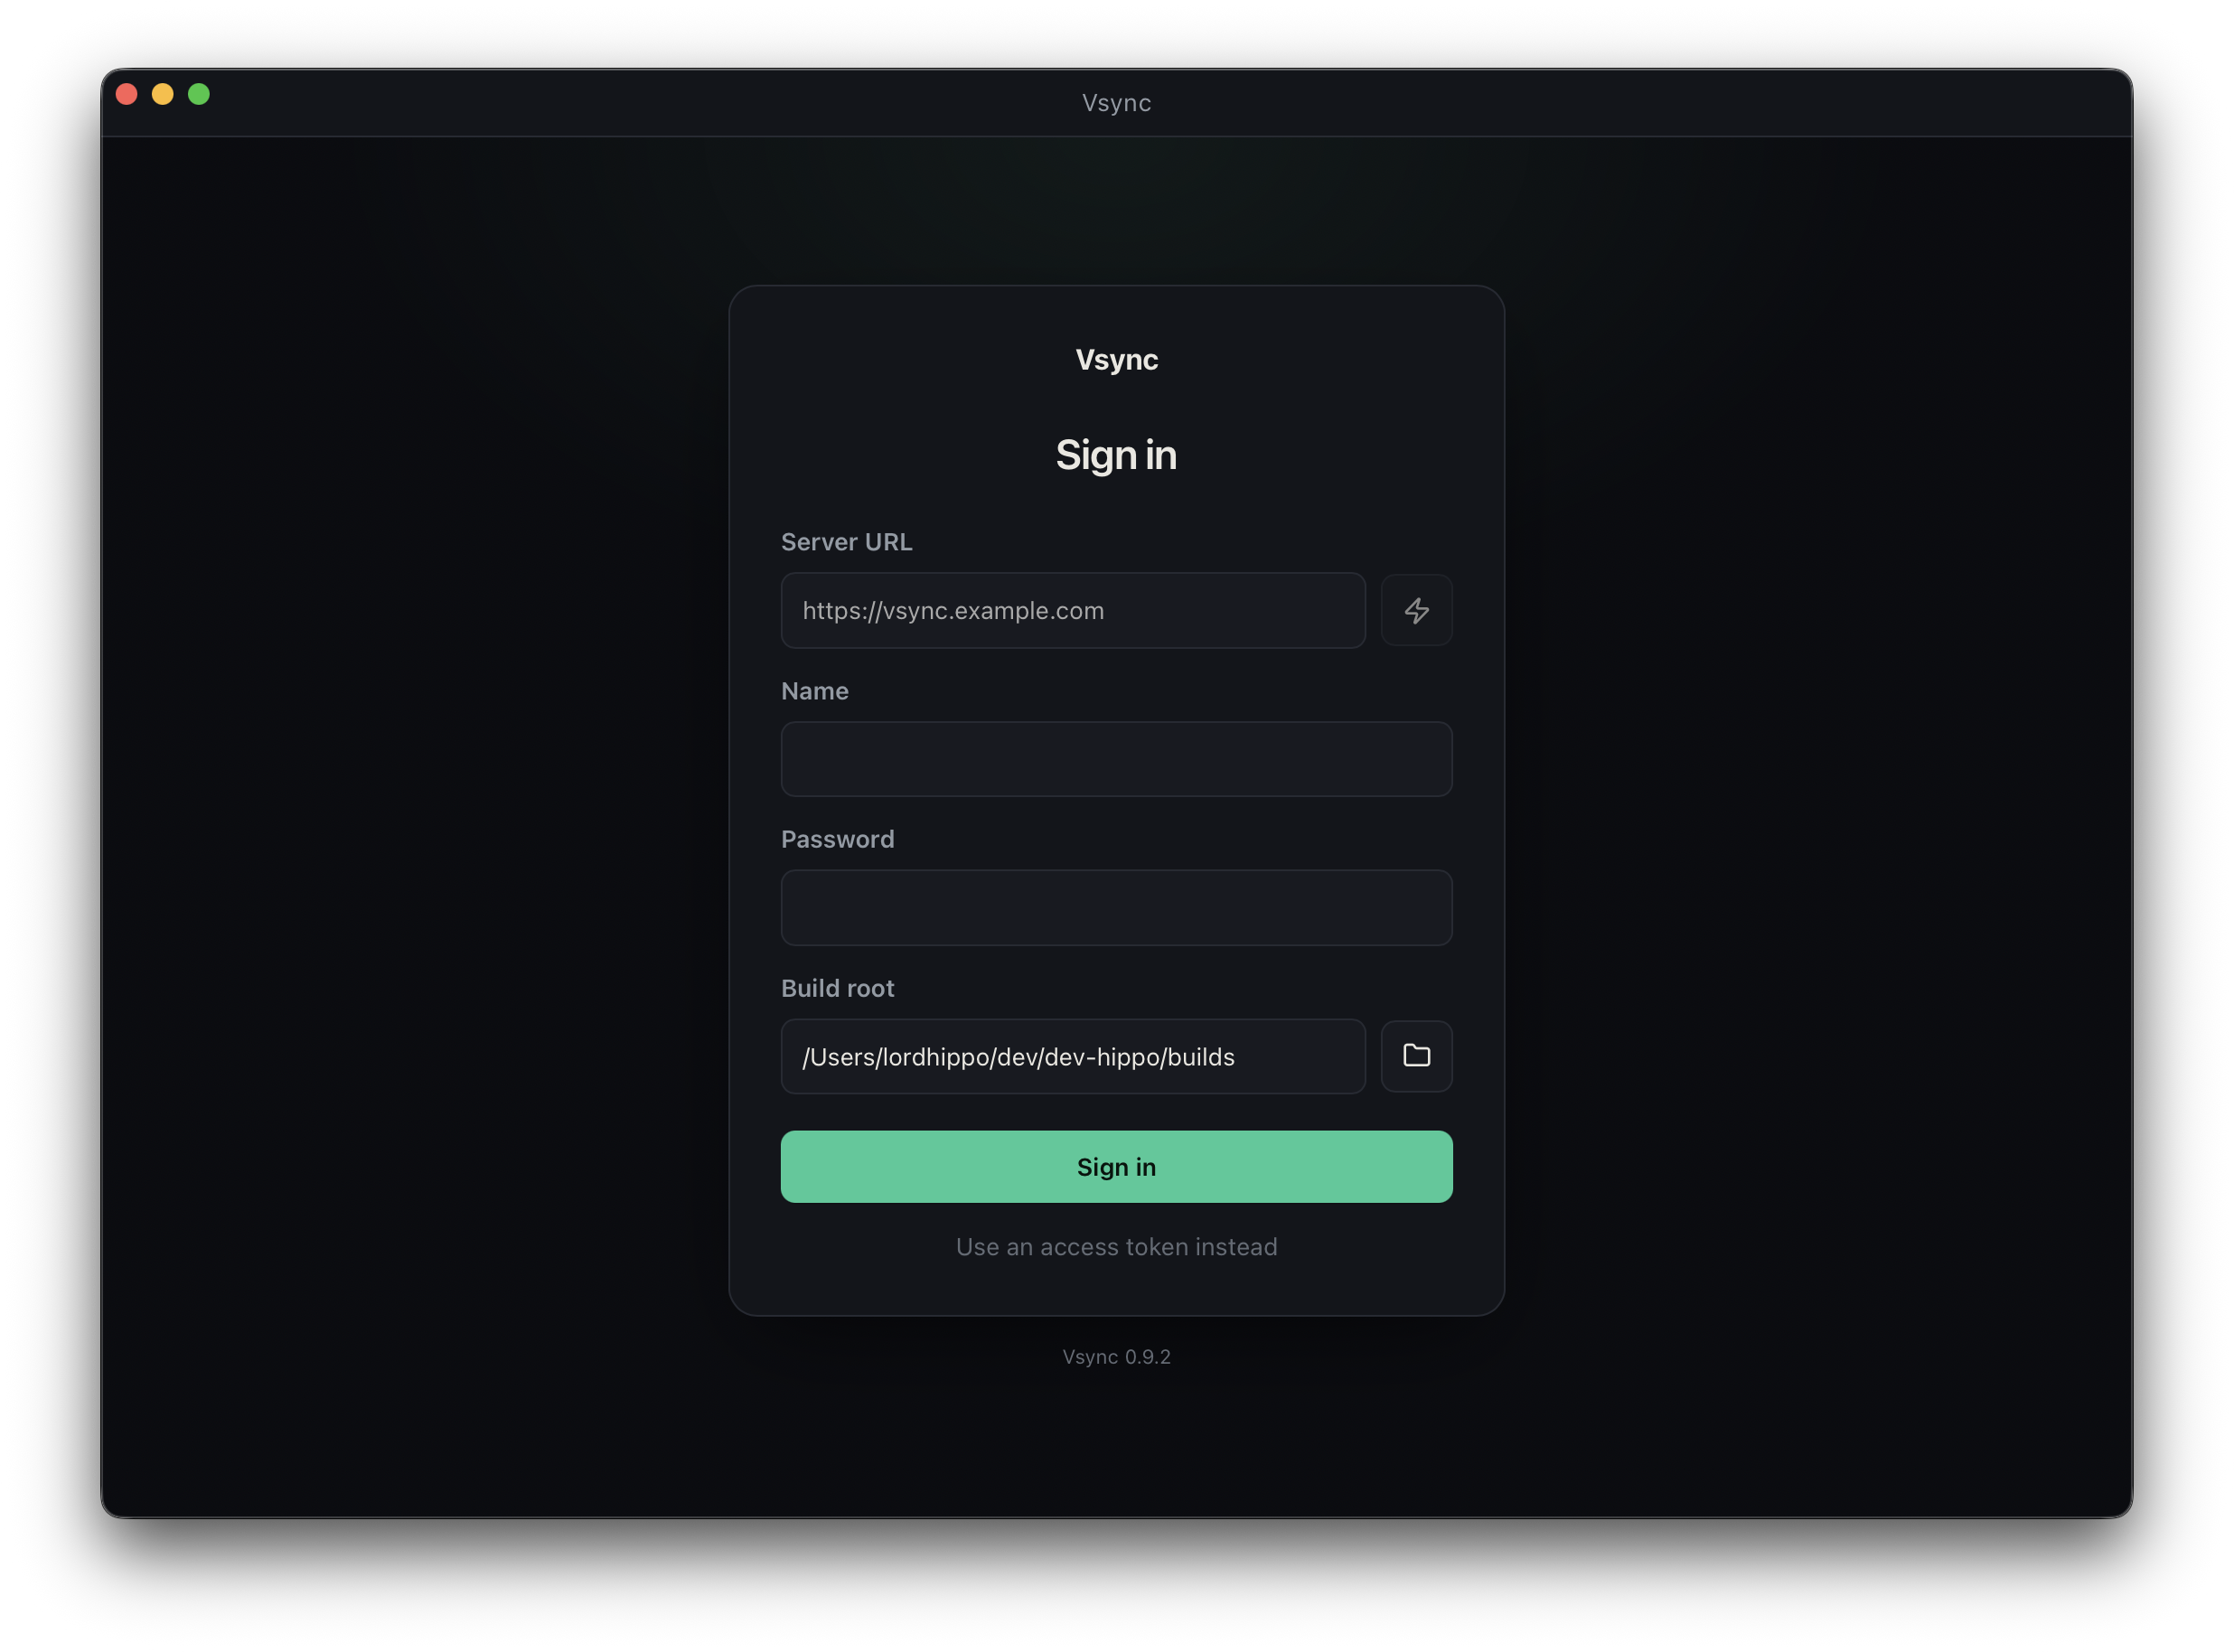
3. Sign in
Enter:
- Server URL: for example,
https://builds.example.com. Do not add/admin. - Name and password: the account from your invite.
- Build root: the folder where downloaded builds should live.
Use the lightning button beside the server URL to test the connection, then choose Sign in.
4. Fetch a build
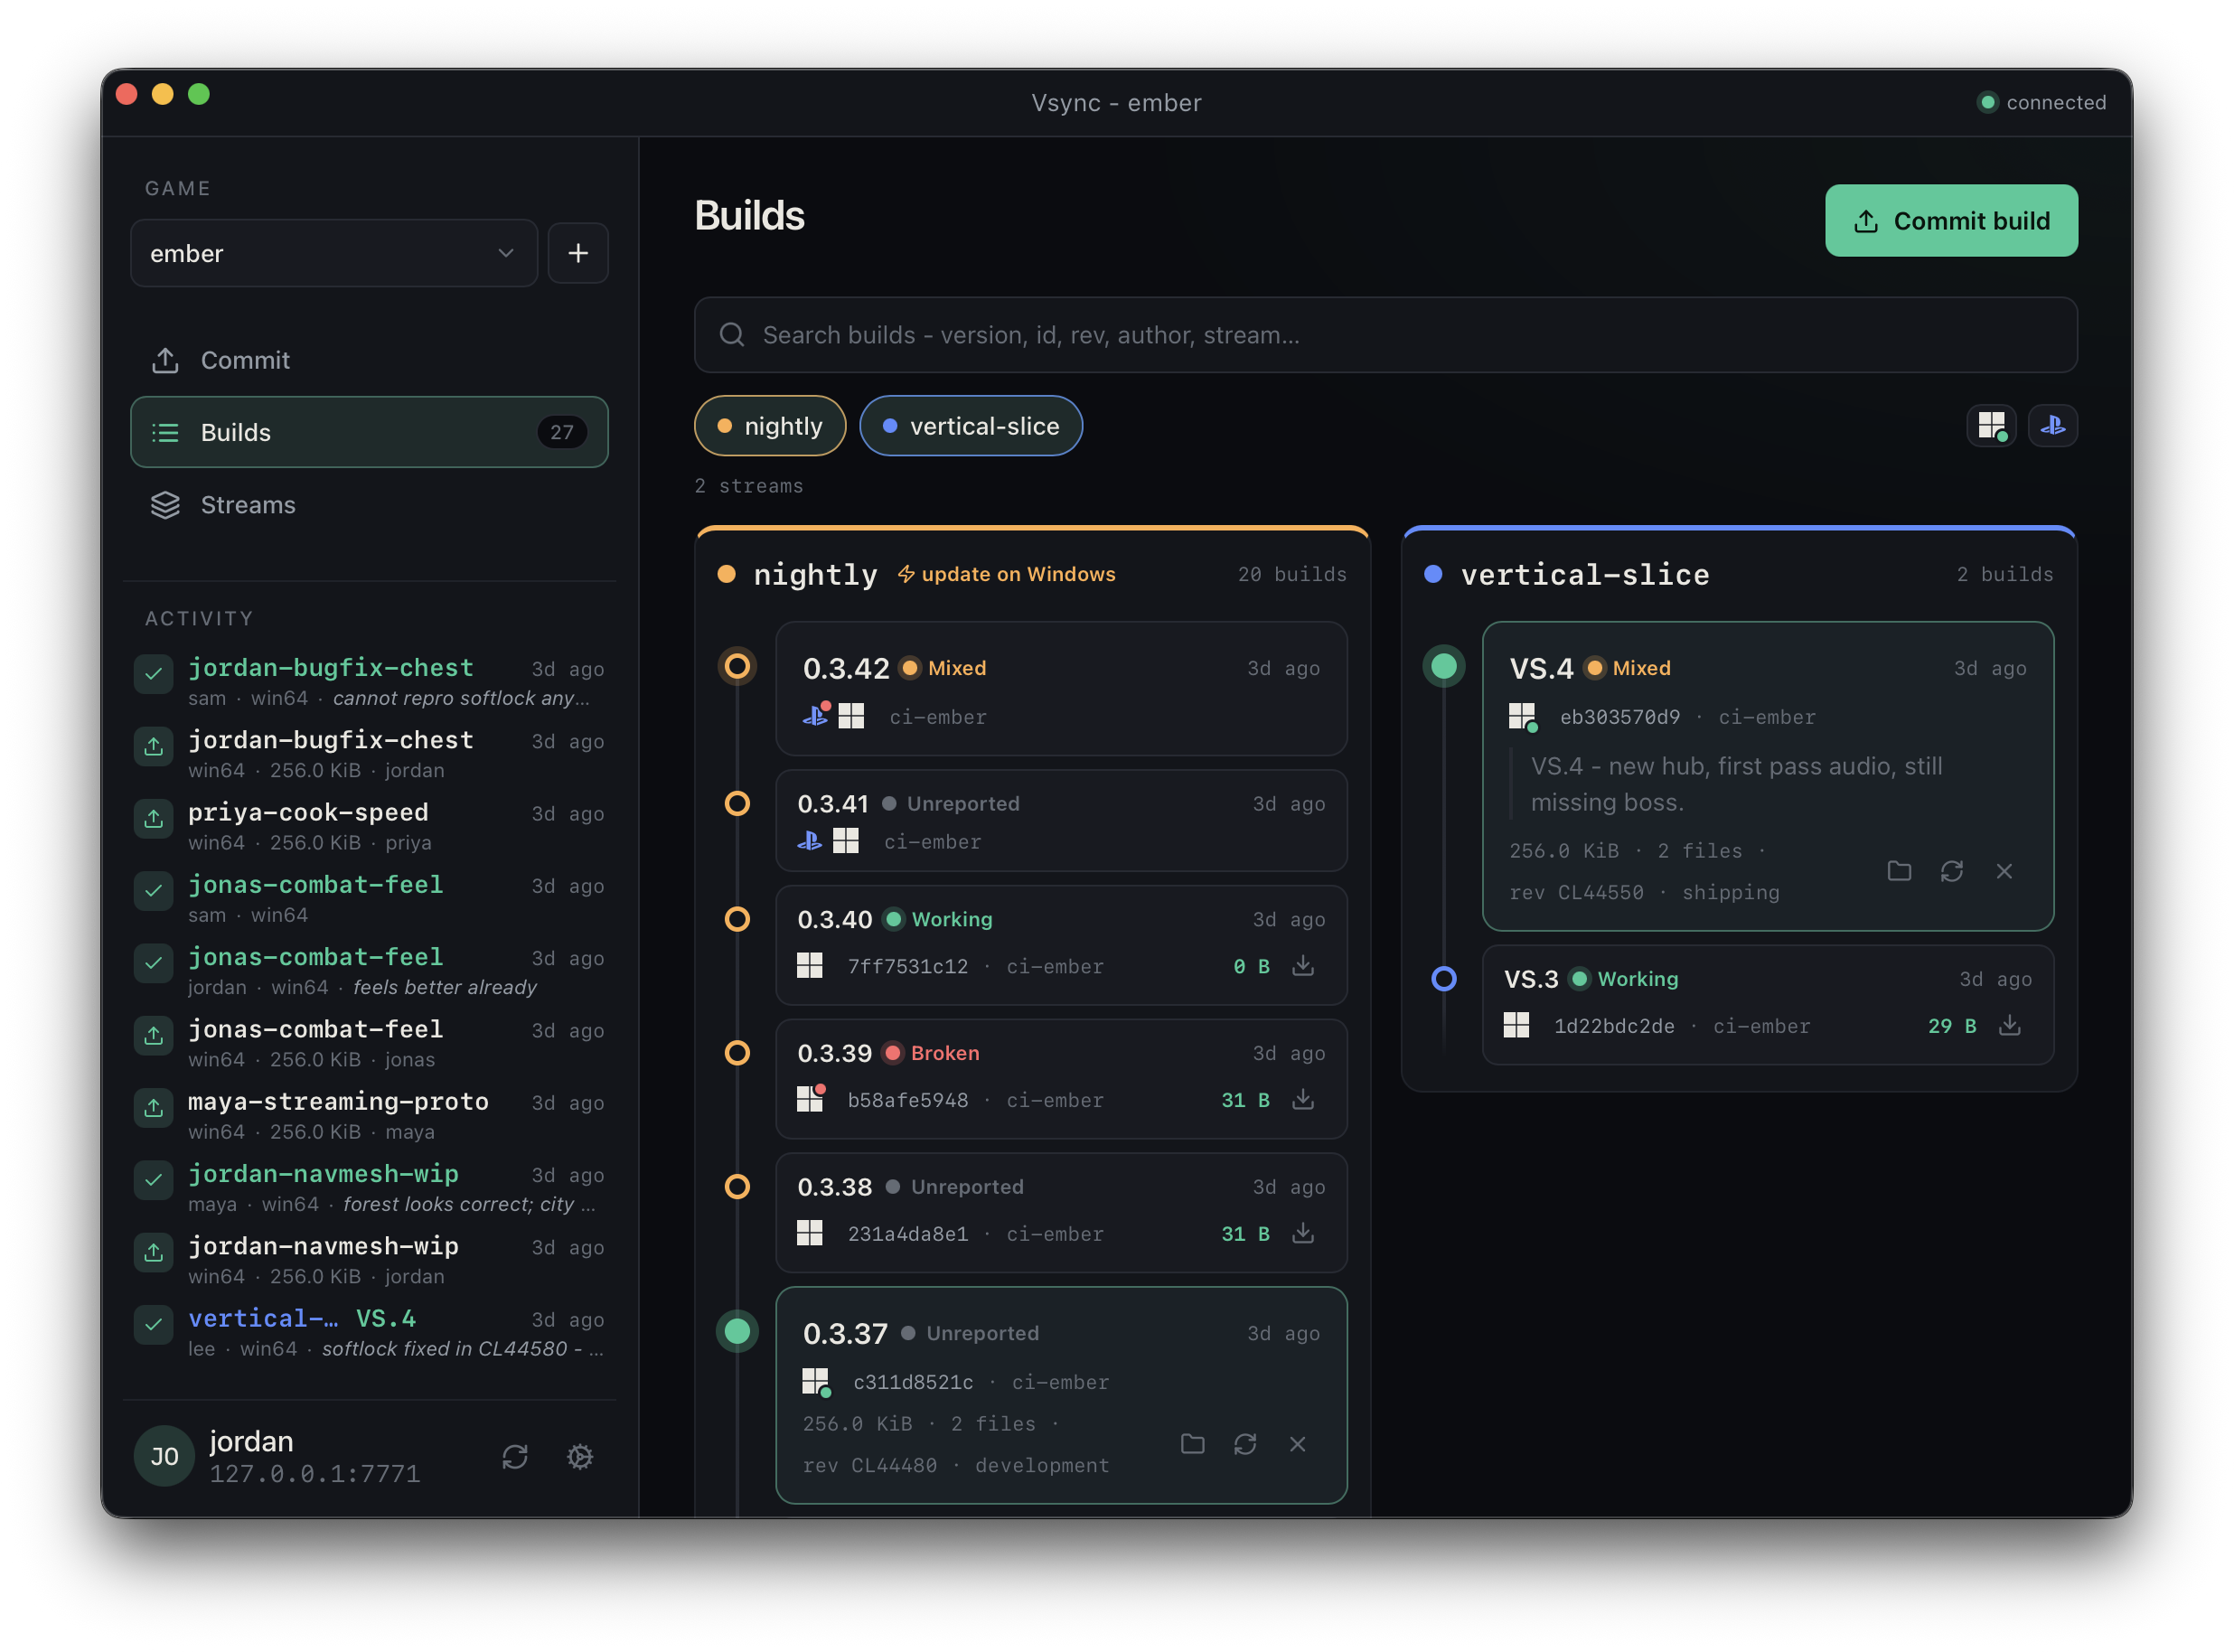
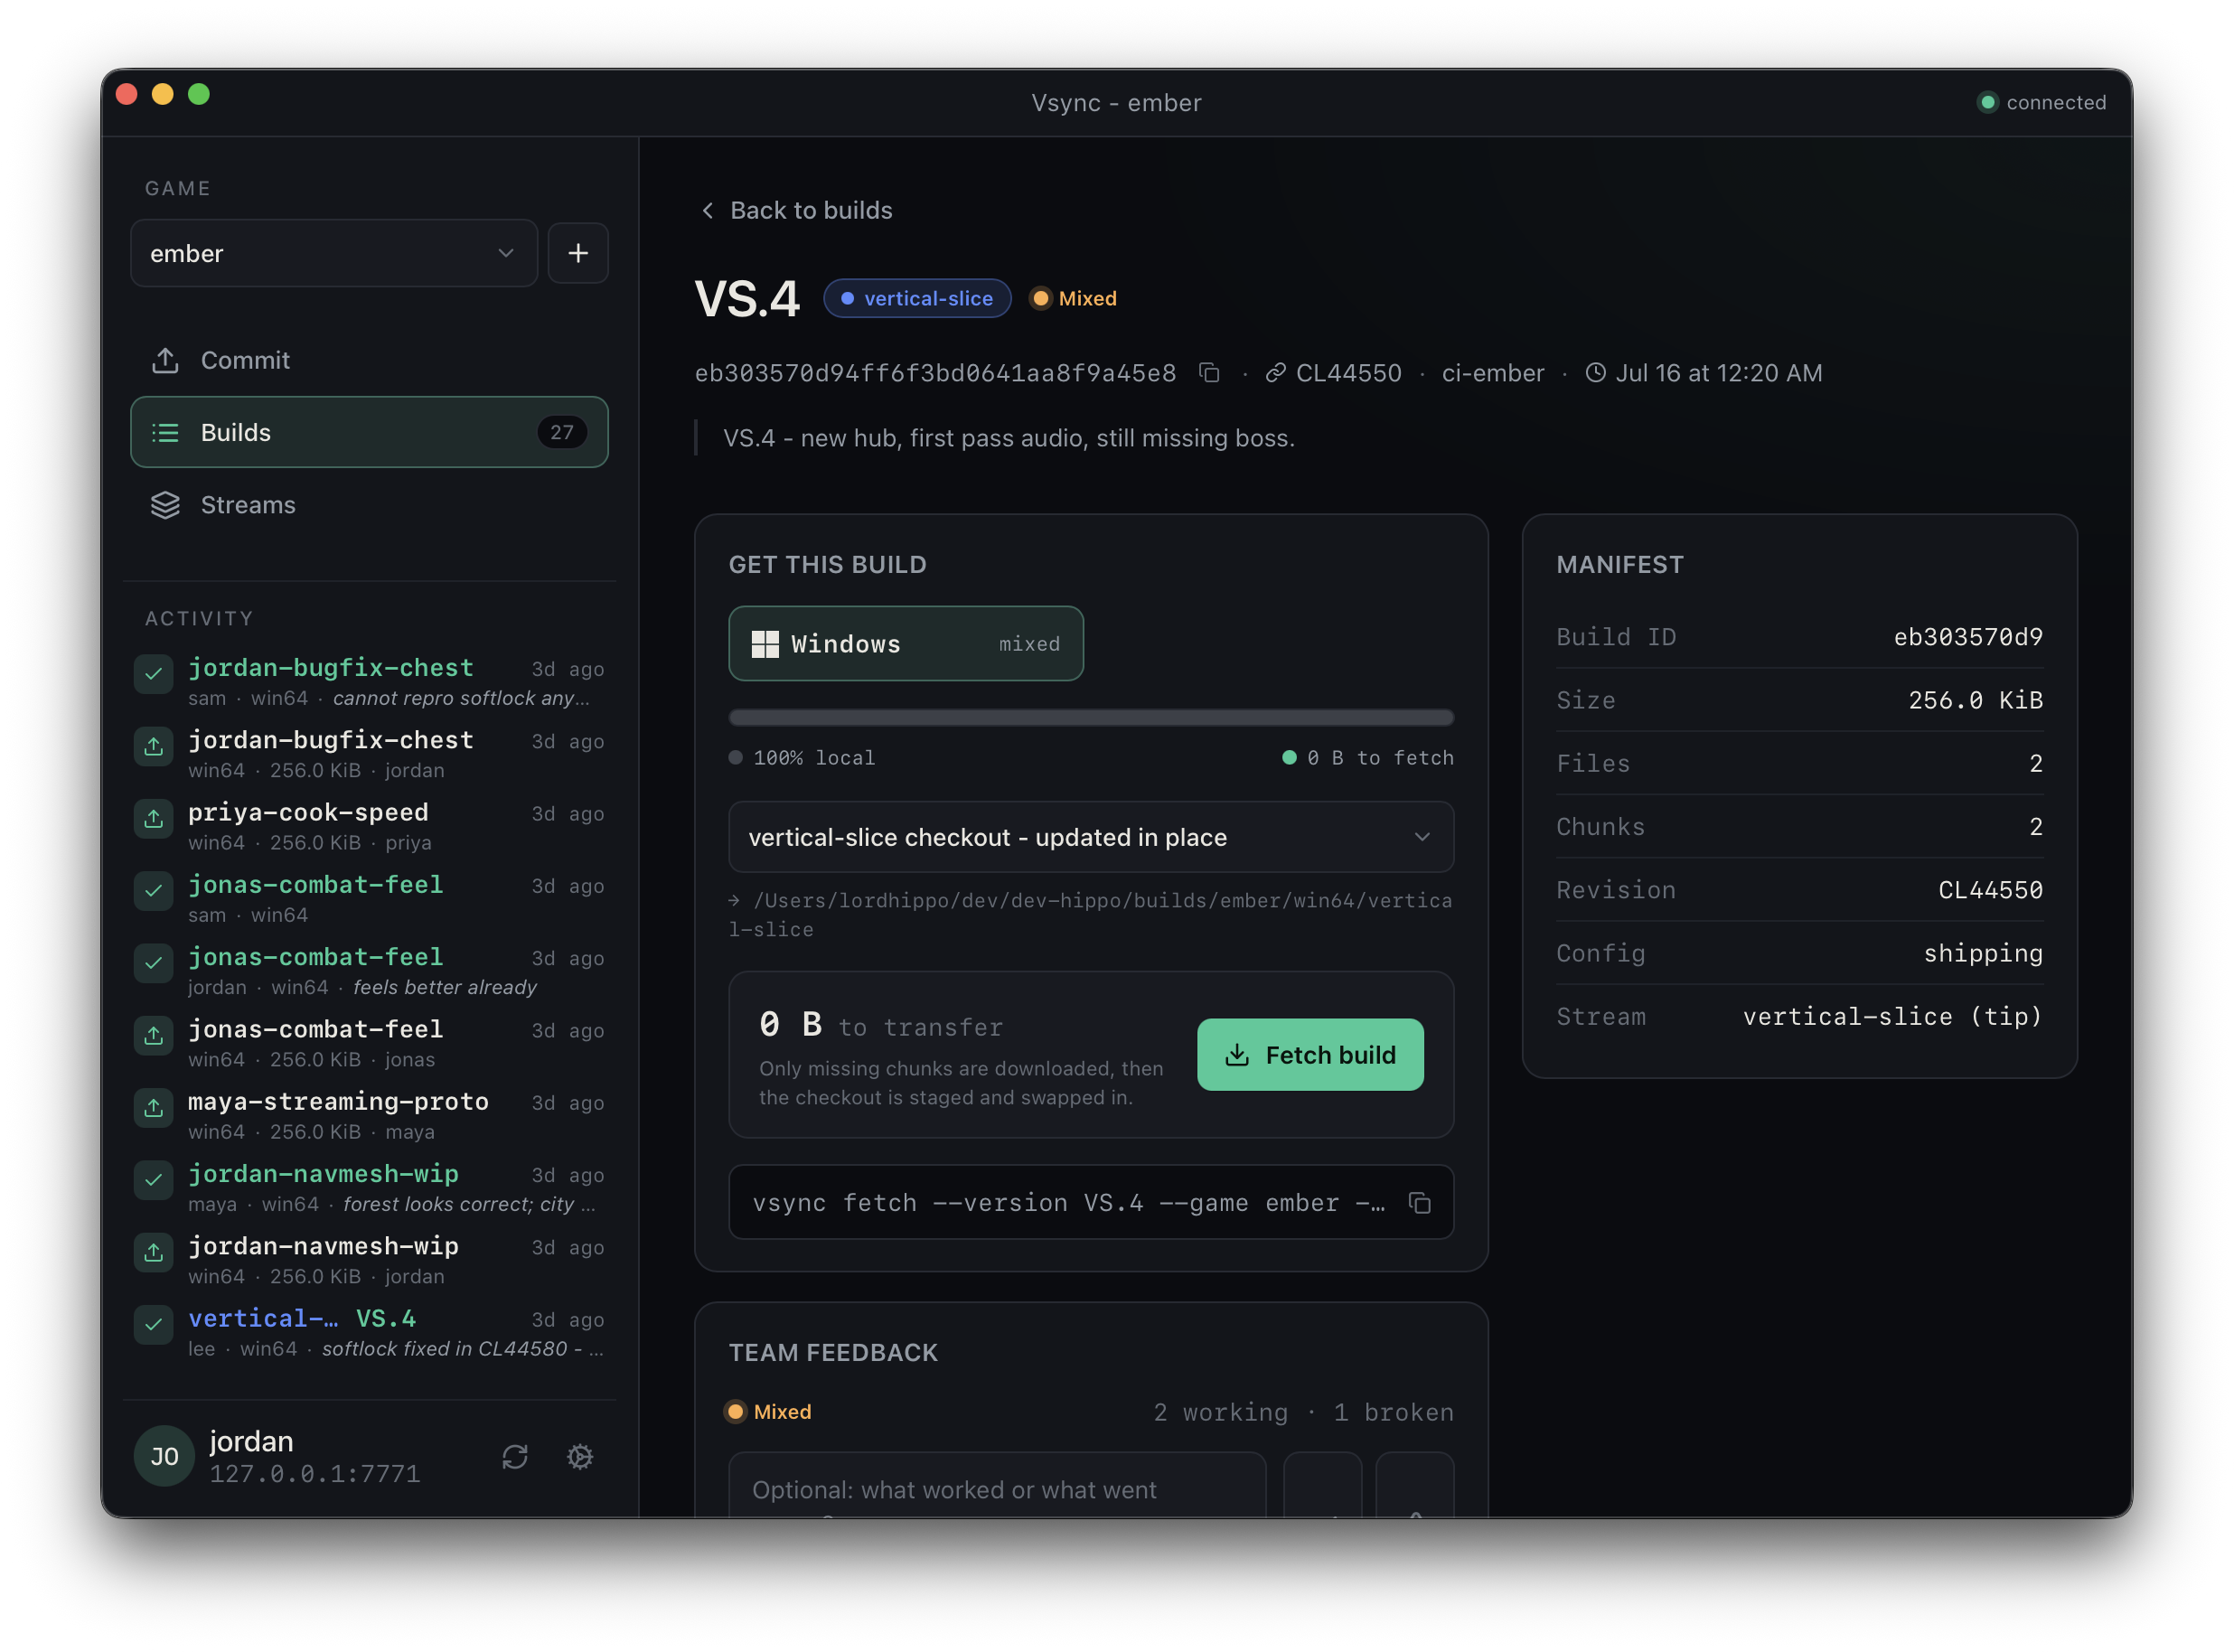
Select your game, open a build, choose its platform, then choose Fetch build. Vsync creates the checkout below your build root. Choose Open folder when the download finishes.
If no game or build exists, the person setting up the team must first publish a build.
For sign-in or download errors, see Client troubleshooting.
Install Vsync
Download current client packages from the Vsync downloads page.
Preview packages are not yet signed by Microsoft or Apple. Before overriding an
operating-system warning, compare the download with its entry in the release's
SHA256SUMS.txt file.
Windows
Run the x86-64 NSIS installer and launch Vsync from the Start menu. The installer is per-user and does not normally require administrator access.
Unsigned preview: The installer and CLI are not yet code-signed. Windows may show Windows protected your PC. If you downloaded Vsync from the official downloads page, choose More info, then Run anyway. If that option is unavailable, Smart App Control or an organization policy is blocking unsigned software and has no per-app bypass. Do not disable security protection just to install Vsync; ask your IT administrator or wait for a signed build. See Microsoft's SmartScreen guidance.
For command-line or CI use, download the Windows CLI zip, extract vsync.exe,
and place it in a directory on PATH.
macOS
Download the universal DMG, open it, and drag Vsync into Applications. The universal application supports Apple Silicon and Intel Macs.
Unsigned preview: The app and CLI are not yet signed or notarized. macOS may say that Apple cannot check Vsync for malicious software or that its developer cannot be verified. If you downloaded Vsync from the official downloads page, try to open it once, then open System Settings → Privacy & Security, scroll to Security, choose Open Anyway, then Open. See Apple's instructions.
The CLI tarball contains a universal vsync binary. Extract it into a location
on PATH, such as /usr/local/bin.
Linux
Ubuntu 26.04 or newer on x86-64 is required. Download the AppImage, make it executable, and run it:
chmod +x Vsync_*.AppImage
./Vsync_*.AppImage
The CLI tarball contains the vsync binary:
tar -xzf vsync_*_linux-x86_64.tar.gz
sudo install -m 755 vsync /usr/local/bin/vsync
Verify the CLI
vsync --version
The desktop app and CLI share the same login, build root, and local cache on a machine.
Continue with the desktop quick start or connect the CLI.
Staying current
The desktop app checks automatically on launch and periodically while running;
Settings can disable the check or run it manually. The CLI checks at most once
a day and prints at most one reminder per day. It stays silent in CI and when
output is piped. Set VSYNC_UPDATE_CHECK=0 to disable the CLI check.
Connect to a server
Your administrator sends you an invite link. Open it, pick a password, and you have an account. Ask them for:
- The server address, such as
https://builds.example.com. - The game and platform names used by your team.
- A local directory where downloaded builds should live.
Desktop app
Follow the desktop quick start. Raw access tokens are intended for automation, but the desktop app accepts one through Use an access token instead when necessary.
Command-line client
vsync login --server https://builds.example.com
Enter your user name or email and password when prompted. Pasting an access token at the name prompt also works.
Set the shared checkout directory:
vsync root D:\builds
On macOS or Linux, use a path such as ~/builds instead. The directory is
marked for the server you just logged in to; each server gets its own build
root.
Check the connection and list available games:
vsync doctor
vsync game list
The login is stored for future sessions; it expires after 30 days, after
which you simply sign in again. Run vsync logout to revoke the token on
the server and remove the stored login; cached data and checkouts remain
untouched.
CI credentials
Automation should not run interactive login. Ask an admin for a CI token and provide it through the environment:
export VSYNC_SERVER=https://builds.example.com
export VSYNC_TOKEN=vs_...
export VSYNC_GAME=my-game
export VSYNC_PLATFORM=win64
Environment values take precedence over the stored login.
In Windows PowerShell, set the same values with $env:, for example:
$env:VSYNC_SERVER = "https://builds.example.com"
$env:VSYNC_TOKEN = "vs_..."
$env:VSYNC_GAME = "my-game"
$env:VSYNC_PLATFORM = "win64"
Desktop app
The desktop app organizes builds by game and lets you fetch, update, inspect, and publish them without using the command line. For your first download, use the desktop quick start.
Select a game
The app is scoped to one game at a time. Choose the current game from the game picker. If the server has no games, Create game registers the first one.
Deleting a game from Settings removes all of its streams and build metadata, including pinned builds. Its unreferenced chunks are reclaimed by server garbage collection later.
Browse builds
The Builds page groups matching platform builds into one version row. Use search and stream filters to narrow the feed. A row can show:
- Version or source revision.
- Platforms available for that build.
- Stream membership.
- Author, age, notes, and broken status.
- Whether a checkout is already local.
- How much data must be downloaded.
Open a build to see its complete metadata and platform variants.
Fetch a build
Select a platform and choose Fetch build. You can create a new checkout or update a checkout associated with a stream.
Vsync downloads only missing chunks. The new checkout is staged before it replaces the old one. If you cancel or the operation fails, downloaded chunks remain cached for the next attempt and the previous checkout remains usable.
From a local build you can:
- Open its directory.
- Fetch it again to verify and repair the checkout.
- Update it when a newer build has landed in its stream.
- Delete the checkout without clearing the shared cache.
Work with streams
The Streams page shows each stream, its description, the newest build of each platform in it, and your local status. Open a stream to see its builds newest-first and fetch an earlier one.
New stream creates one. Builds join a stream only when they are committed, so create the stream before the build that belongs in it.
Deleting a stream asks what to do with its builds: keep them, in which case they leave the stream and are kept only while pinned or young, or delete them with the stream - pinned builds included.
Publish a build
Create a game and stream first if the server is empty. Then open Commit and:
- Choose the build directory.
- Wait for Vsync to stage and price the upload.
- Select the platform.
- Choose the stream, and enter a version and optional source revision, build configuration, release notes, and pin status.
- Review the number of missing chunks and bytes to upload.
- Choose Commit.
A version is unique within the chosen stream (per platform) and may repeat across streams - a rebuild of the same changelist can live in another stream. The stream is chosen here and nowhere else: a published build cannot be moved into another stream afterwards.
Settings and storage
Settings controls start-on-login, download notifications, crash reports, updates, the connection check, and diagnostic logs. Crash reporting is enabled by default, shared with the CLI, and can be disabled there; the change takes effect after restart.
Settings also changes the build root, shows cache and checkout usage, opens or deletes checkouts, clears cached downloads, and signs out.
Clearing the cache keeps checkouts but makes future downloads transfer those chunks again. A local-only commit that has never been uploaded can no longer be reconstructed after its cached data is cleared.
Command-line client
Run vsync <command> --help for the exact options supported by your installed
version.
Common context
Most remote commands need a game and platform:
vsync --game hippo --platform win64 list
You can set VSYNC_GAME and VSYNC_PLATFORM instead.
Vsync also reads context from where you run it: inside a checkout it knows the game, platform, and stream from the checkout's marker. Explicit flags always win.
Browse builds
vsync --game hippo --platform win64 list
The output includes streams and recent builds, including versions, authors, source revisions, broken status, pin status, and notes.
Fetch builds
Fetch the current tip of a stream:
vsync --game hippo --platform win64 fetch nightly
Fetch an exact version:
vsync --game hippo --platform win64 fetch --version 2193.1.2
A version is unique within its stream (per platform), but may repeat
across streams - a rebuild of the same changelist can live in both
nightly and rc. When several builds share the version you asked for,
the fetch stops and lists them so you can pick a build ID.
Fetch an exact build by its ID (its game and platform come from the server, so no flags are needed):
vsync fetch 42
Without --out, Vsync creates the checkout below the build root - streams
at <root>/<game>/<platform>/<stream>, exact builds under
<root>/<game>/<platform>/builds/. Every fetched directory is a managed
checkout: it carries a .vsync-checkout.json marker recording the server,
game, platform, stream, and build it holds, and updates replace the
directory wholesale.
Inside a stream checkout, update it to the stream's current tip with no arguments at all:
vsync fetch
An exact-build checkout tracks no stream, so a bare fetch inside one is an error.
Verify a checkout
Checkouts are ordinary directories, so files can drift - get edited, corrupted, or deleted. Compare one against the build it was fetched from:
vsync verify D:\builds\test
Checkouts made by the desktop app record their build; for other directories
pass the build explicitly with --build <id>. Files that drifted or went
missing are listed, and --repair rewrites exactly those files from the local
cache, downloading any chunks the cache no longer has:
vsync verify D:\builds\test --repair
Extra local files that are not part of the build (logs, saves, configs) never fail verification and are never deleted. To reset a checkout wholesale, fetch the build again into an empty directory.
Publish a build
vsync --game hippo --platform win64 commit D:\build-output `
  --stream nightly `
  --version 2193.1.2 `
  --rev CL45210 `
  --config development
The final line is the registered build's ID, like #42. Recommitting
identical contents uploads no duplicate chunks; with the same metadata it is a
retry and answers with the existing build, while different metadata (a new
version, another stream) registers a new build sharing the same stored
contents.
--stream is the only place a build's stream is set, and the stream must
already exist. Without it, the build belongs to no stream and is kept only
while it is young or pinned.
Machine-readable output for CI
commit and fetch accept --json, replacing the text output with one
JSON object on stdout so pipelines parse results instead of scraping text:
vsync --game hippo --platform win64 commit D:\build-output --stream nightly --json
{"content_id":"067c4e9949d5d77952ac78bfb1a823ab","build":42,"files":1214,
 "bytes":18321047552,"chunks":8956,"new_chunks":412,"new_bytes":864026624,
 "dedup_ratio":0.953,"uploaded_chunks":412,"uploaded_bytes":864026624,
 "game":"hippo","platform":"win64","stream":"nightly"}
dedup_ratio is the share of the build's bytes the destination already
had. build and uploaded_* appear only when the commit pushed to a
server; the game/platform/stream fields echo what the build was
published as.
fetch --json reports build, content_id, files, bytes, the out
directory, and - when pulling from a server -
downloaded_chunks/downloaded_bytes. Progress and errors still go to
stderr, so stdout stays pure JSON.
Manage games
vsync game list
vsync game create hippo
vsync game delete hippo --yes
Create the game before its first stream or build. Deleting a game immediately removes all of its streams and build metadata, including pinned builds. Garbage collection reclaims the unreferenced chunks later.
Manage streams
vsync --game hippo stream create nightly --description "Latest automated build"
vsync --game hippo stream list
vsync --game hippo stream describe nightly "Latest automated build"
vsync --game hippo stream delete nightly
vsync --game hippo stream delete nightly --delete-builds --yes
Streams belong to a game, not to a platform. Deleting one leaves its builds in
place, now in no stream, where normal retention and garbage collection rules
apply. --delete-builds deletes them with the stream instead - pinned builds
included - and their storage is reclaimed by the next garbage collection.
Report and pin builds
vsync report 42 --verdict broken --note "Crashes during startup"
vsync report 42 --verdict good --note "Campaign and multiplayer both load"
vsync report 42 --remove
vsync pin 42
vsync pin 42 --remove
Build IDs are shown as #42 around the product; the leading # is optional
on the command line (quote it in a shell, where # starts a comment).
Each user has one report per build and can update or withdraw it. Reports and their notes are visible to the team. Pinned builds are protected from server garbage collection.
Check your connection
vsync doctor
Measures latency, jitter, and download and upload throughput against the connected server, over the same transfer path a sync uses.
Without a login, check a server anonymously (the server rate-limits anonymous checks):
vsync doctor --server https://builds.example.com
An anonymous version of the check runs in a browser at
https://<server>/diag - useful for people who do not have the CLI
installed.
Sign out
vsync logout
This revokes the token on the server and forgets the login. It does not remove cached chunks or checkouts.
Local storage
Vsync separates its reusable cache from materialized checkouts.
Default locations
The cache defaults to <build-root>/.vsync-cache. Override it with --store
or VSYNC_STORE. The desktop app and CLI use the same cache.
The build root is the parent directory for checkouts created without an
explicit --out path:
vsync root
vsync root D:\builds
Changing the build root selects a new default cache. Existing cache data in the previous root is left in place.
Plan free space
The cache stores reusable chunks, while each checkout stores a complete materialized build. Both consume disk space. During an update, Vsync keeps the old checkout until its replacement is staged, so peak usage can include the cache, old checkout, and new checkout at once.
Setting the root marks the directory for the server you are logged in to
(a .vsync-root.json file inside it). A root belongs to one server; use a
different directory for each server you work with.
Inspect the cache
vsync cache status
Prune old cached builds
Preview first:
vsync cache prune --keep-builds 3 --dry-run
Then reclaim the space:
vsync cache prune --keep-builds 3
Pruning keeps the selected newest cached build manifests and all chunks they need. A remote build can be downloaded again later.
Clear the cache
vsync cache clear --yes
This removes cached manifests and chunks but leaves materialized checkouts on disk. Do not clear the only copy of a local build that has not been uploaded.
Client troubleshooting
The installer or app will not open
The preview packages are not yet signed. Follow the Windows or macOS warning steps under Install Vsync. Only bypass the expected unrecognized app or developer cannot be verified warning for a package from the official Vsync downloads page.
Do not bypass a malware, damaged-file, or invalid-package warning. Download the package again and report the exact message, operating system, and Vsync version.
The desktop app cannot reach the server
Enter the server URL without /admin, then use the lightning button beside it
to check the connection. You can also open https://<server>/healthz in a
browser; it should show ok without a certificate warning.
If the health check fails, the server administrator must check DNS, HTTPS, and the Vsync service.
“No server” or “run vsync login”
Sign in again and confirm the server address:
vsync login --server https://builds.example.com
For CI, verify that both VSYNC_SERVER and VSYNC_TOKEN are present.
Unauthorized or invalid token
For a password account, confirm that you opened the invite link and use the same name shown there. Ask an administrator for a new invite if needed.
For a raw token, it may be mistyped or revoked. Ask an administrator to issue a new one.
No build root configured
Set one. For a one-off command without a build root, pass both an explicit store and output directory:
vsync root D:\builds
vsync --store D:\vsync-cache fetch <build-id> --out D:\temporary-build
Build or stream not found
Check the selected game and platform. Streams are scoped to a game, and versions are unique within a game and platform. Fetching a stream needs a platform too: it resolves to the newest build of that platform in the stream, so a stream with no build for it fails.
Interrupted download
Run the fetch again. Completed chunks remain in the cache and are reused. The old checkout remains intact until staging completes.
A checkout looks damaged
Fetch the same build again from the desktop app, or run vsync fetch against
the managed destination. Vsync reconstructs the checkout from verified chunks.
Disk usage is too high
Inspect Settings in the desktop app or run vsync cache status. Delete unused
checkouts separately from pruning or clearing the cache.
Server overview
vsync-server is the shared object store and metadata service used by the
desktop and command-line clients. One server can host multiple games,
platforms, streams, and users.
The supported production deployment is:
- An Ubuntu 26.04 or newer x86-64 server.
- Local NVMe storage.
vsync-servermanaged by systemd.- Caddy or another reverse proxy providing HTTPS.
- Password accounts for people and raw tokens for CI.
The server stores:
- Content-addressed chunks in
objects/. - Immutable build manifests in
manifests/. - Builds, streams, users, and activity metadata in
meta.sqlite.
The server itself speaks plain HTTP. Do not expose its listening port directly to the internet; put an HTTPS reverse proxy in front of it.
Sizing
For a small team, start with 2–4 CPU cores, 8 GB RAM, and fast local NVMe. Storage and outbound bandwidth matter more than CPU. Size the disk for one full copy of the initial builds plus the changed chunks retained from later builds.
Avoid storage backed by a slow network filesystem. Chunk transfer, manifest assembly, and garbage collection benefit from predictable local filesystem latency.
Supported server platforms
Ubuntu 26.04 or newer on x86-64 is the supported production platform. An experimental Windows x86-64 binary is available for evaluation and small internal setups, but it does not yet include native Windows Service integration. macOS is not a server target.
Install and configure a server
This is the shortest supported setup for a remote team.
Before you start
You need:
- An Ubuntu 26.04 or newer x86-64 server with
sudoaccess. - A domain such as
builds.example.compointing to the server. - Inbound ports 80 and 443 open. Keep port 7770 private.
See Server overview for sizing guidance.
1. Install Vsync
Download the current server .deb from the
Vsync downloads page, then run this from its directory:
sudo apt install ./vsync-server_*-1_amd64.deb
The package installs the server, a systemd service, /etc/vsync/server.toml,
and a locked-down vsync user. Data lives in /var/lib/vsync.
2. Start the server
The default configuration listens on 127.0.0.1:7770 and is suitable for
Caddy. Review /etc/vsync/server.toml using the
configuration reference, then run:
sudo systemctl enable --now vsync-server
curl http://127.0.0.1:7770/healthz
The health check must print ok. After a configuration change, run:
sudo systemctl restart vsync-server
3. Add HTTPS
Install Caddy:
sudo apt install caddy
Replace builds.example.com in /etc/caddy/Caddyfile:
builds.example.com {
    reverse_proxy 127.0.0.1:7770
    request_body {
        max_size 256MB
    }
}
Reload Caddy and test the public address:
sudo systemctl reload caddy
curl https://builds.example.com/healthz
The response must be ok without a certificate warning. See
HTTPS and networking if it is not.
4. Create the first administrator
Create your account on the server; --admin assigns the server-wide admin role:
sudo -u vsync vsync-server user add ali --admin
The command prints a one-use invite path. Add it to your server address, open
the resulting URL, and choose a password. Then sign in at
https://builds.example.com/admin.
Use Users to invite each teammate, then the Access page to assign what they need - a fresh server already lets any signed-in account browse, fetch, report on, and commit builds, but pinning, stream and game management, and the admin surfaces need explicit roles. The server can send invitations through an optional SMTP relay; see Server configuration. People use accounts and passwords; raw tokens are for CI. See Users and authentication.
5. Publish the first build
Install the desktop app on your computer and follow the desktop quick start. If the server is empty:
- Choose Create game.
- Open Streams and choose New stream.
- Open Commit and publish a build into that stream.
Your teammates can now sign in and fetch it.
Experimental Windows server
The Windows x86-64 server is for evaluation only and does not install a
Windows Service. Extract the server zip, create a writable data directory and
server.toml, then run it behind an HTTPS reverse proxy:
vsync-server.exe --config C:\Vsync\server.toml serve
Server configuration
The Linux package reads /etc/vsync/server.toml. Unknown settings are rejected,
so a typo stops the service instead of being ignored.
| Setting | Effective default | Purpose |
|---|---|---|
root | /var/lib/vsync | Server data directory. |
addr | 127.0.0.1:7770 | Plain-HTTP listen address behind the HTTPS proxy. |
public_url | unset | Canonical HTTPS origin used in emailed invite links. Required with email. |
min_free_gb | 10 | Refuse uploads below this much free disk; 0 disables the guard. |
webhook | unset | Incoming webhook for build announcements. |
crash_reports | true | Send server crash reports to DevHippo. |
sentry_dsn | DevHippo endpoint | Send crash reports to your own Sentry-compatible endpoint. |
email.from | unset | Sender mailbox for invite email. |
email.smtp_host | unset | SMTP relay hostname. |
email.smtp_port | 587 or 465 | Relay port, based on the selected TLS mode. |
email.smtp_tls | starttls | starttls or implicit TLS. Unencrypted SMTP is not supported. |
email.smtp_username | unset | SMTP relay username. Omit both credential settings when the relay authenticates by source IP. |
email.smtp_password_env | unset | Name of the environment variable holding the SMTP password. |
email.smtp_pool | false | Keep the SMTP connection open between sends instead of reconnecting per message. |
gc.enabled | true | Sweep at startup and daily. |
gc.keep_history | 14 | Keep this many newest builds per stream and platform. |
gc.keep_days | 7 | Keep builds younger than this many days. |
GC settings belong under a [gc] table:
root = "/var/lib/vsync"
addr = "127.0.0.1:7770"
min_free_gb = 10

[gc]
enabled = true
keep_history = 14
keep_days = 7
Set crash_reports = false to disable server crash reports. This does not
affect clients.
Invite email
Vsync can send account and password-reset invitations through any SMTP relay. For example, Resend uses this configuration after its sending domain has been verified:
public_url = "https://builds.example.com"

[email]
from = "Vsync <invites@example.com>"
smtp_host = "smtp.resend.com"
smtp_port = 587
smtp_tls = "starttls"
smtp_username = "resend"
smtp_password_env = "VSYNC_SMTP_PASSWORD"
Some relays authenticate the server by its source IP instead of a password -
Google Workspace's smtp-relay.gmail.com with a registered IP, or an internal
smarthost. For those, omit smtp_username and smtp_password_env; the
connection still requires TLS.
Otherwise, place the password in the root-readable environment file installed by the Linux package:
sudo sh -c 'printf "%s\n" "VSYNC_SMTP_PASSWORD=replace-with-the-relay-key" > /etc/vsync/server.env'
sudo chmod 600 /etc/vsync/server.env
sudo systemctl restart vsync-server
Use a transactional email relay rather than sending directly from the Vsync host. Configure SPF and DKIM with that provider, and leave link and open tracking disabled for invitation messages. If delivery is not configured or a send fails, the admin page still shows the one-use link for manual delivery.
Matching command-line options override the file. Use --config <path> or
VSYNC_SERVER_CONFIG=<path> to select another file. Restart the service after
editing it:
sudo systemctl restart vsync-server
sudo systemctl status vsync-server
HTTPS and networking
The normal layout is:
clients → HTTPS :443 → Caddy → HTTP 127.0.0.1:7770 → vsync-server
Create a DNS record such as builds.example.com pointing at the VPS. Allow
ports 80 and 443 through the firewall, but do not allow public access to port
7770.
Caddy configuration
builds.example.com {
    reverse_proxy 127.0.0.1:7770
    request_body {
        max_size 256MB
    }
}
Reload Caddy and verify the public endpoint:
sudo systemctl reload caddy
curl https://builds.example.com/healthz
Caddy obtains and renews the TLS certificate automatically when DNS and ports 80/443 are correct.
The proxy is the security boundary: Vsync decides admin cookie security and,
when email is disabled, builds invite links from the Host and
X-Forwarded-Proto headers it receives. Emailed links use the configured
public_url. Caddy makes the headers trustworthy by construction - it only
forwards requests whose Host matches the site, and it sets
X-Forwarded-Proto itself, ignoring the client's. If you use a different
proxy, it must do the same: route or reject by Host, and overwrite
X-Forwarded-Proto rather than passing the client's value through.
Private-network alternative
For a server that must not be reachable from the public internet, place the
server and every client on a private network such as Tailscale. Bind Vsync to
the private interface and use the private address as VSYNC_SERVER.
Authentication is still required. If you use plain HTTP on a trusted private network, remember that the desktop updater and browser security features may still require HTTPS for their own endpoints.
Connection checks
Every server serves a self-service connection check at /diag: latency,
jitter, and throughput measured against this server over the same transfer
path a sync uses. The page runs anonymously - handy for people who have no
account or CLI yet.
Anonymous public checks share an hourly transfer budget. Signed-in checks and
direct private-network checks are not metered. This classification relies on
the documented proxy layout, so keep the plain-HTTP port private and overwrite
X-Forwarded-Proto at the proxy.
Webhooks
When webhook is configured, the server posts build publications to that
incoming webhook, naming the stream the build went into. Treat the webhook URL
like a credential: limit who can read the server configuration and rotate the
URL if it leaks.
Users and authentication
People and services are principals. Password sessions and raw tokens are credentials for a principal; roles belong to the principal, not to one credential.
Roles
Content roles are hierarchical:
| Role | Access |
|---|---|
tester | List, inspect, fetch, and report on builds. |
developer | Tester access plus commit builds. |
maintainer | Developer access plus pin builds and manage games and streams. |
tester and developer can cover all games, one game, or one stream.
maintainer can cover all games or one game. A stream assignment covers only
that stream, not sibling streams or builds committed without a stream. A game
assignment covers all of its streams and streamless builds. Assignments can
expire.
Server roles are separate:
| Role | Access |
|---|---|
metrics_reader | Read /metrics. |
admin | Manage people, services, roles, GC, metrics, and the security trail. |
Admins also have maintainer access to every game. Metrics readers have no game
access unless they receive a content role too. admin is what the
admin panel requires: content roles alone do not open
it, and everyone without it works through the desktop app or the CLI.
The desktop app hides what your roles do not reach: a tester sees no Commit screen, and only a maintainer gets the create/delete game, create/delete stream, and edit-description controls. The stream picker on the Commit screen lists only streams you may actually commit into, allowlist included. The server enforces all of this regardless of what any client renders.
A fresh or upgraded server assigns developer on all games to the built-in
everyone principal. This keeps the default collaborative: anyone signed in
can browse, fetch, report, and commit. Assign narrower roles and revoke the
everyone row from the Access page to lock a server down.
Manage assignments from the server host:
sudo -u vsync vsync-server role assign alex maintainer --game ember
sudo -u vsync vsync-server role assign partner tester --game ember --stream release --expires 90d
sudo -u vsync vsync-server role list --game ember
sudo -u vsync vsync-server role revoke 42
The revoke command takes the assignment ID printed by role list.
Stream commit allowlists
New streams allow *, meaning any principal with developer-or-higher access
at that scope may commit. Protect a stream by replacing * with one or more
principal names:
sudo -u vsync vsync-server committer set ember release ci-release,alex
sudo -u vsync vsync-server committer list ember release
The allowlist only restricts commits. It does not grant a role: an allowlisted tester still cannot commit, and an unlisted maintainer or admin cannot commit to a protected stream.
Manage people
Use Users in the admin panel to invite, reset, disable, or re-enable people, and to set the email address they can use when signing in. Password sessions expire after 30 days. Disabling a person revokes all of their credentials and blocks another login.
Bootstrap the first admin on the server host:
sudo -u vsync vsync-server user add ali --admin
Prefix the printed invite path with the server URL, open it, choose a password,
and sign in to /admin.
Set or update an email without resetting the password (admin UI save email, or on the host):
sudo -u vsync vsync-server user set-email ali ali@example.com
Addresses are stored and matched lowercase, so signing in is not case
sensitive. Two accounts cannot share an address: upgrading a server where two
did keeps it on the older account and clears the other, which you can set again
with user set-email.
Service tokens
Raw tokens create or target explicit service identities. They never mint a credential for an existing person:
sudo -u vsync vsync-server token create ci-uploader --expires 90d
sudo -u vsync vsync-server role assign ci-uploader developer --game my-game
The expiry is optional. The token is shown once and only its hash is stored. Keep it in the CI secret store and expose it only to trusted jobs:
VSYNC_SERVER=https://builds.example.com
VSYNC_TOKEN=vs_...
VSYNC_GAME=my-game
VSYNC_PLATFORM=win64
List or revoke service credentials from the host:
sudo -u vsync vsync-server token list
sudo -u vsync vsync-server token revoke ci-uploader
Storage, backups, and upgrades
Data layout
With the packaged defaults, server data lives in /var/lib/vsync:
meta.sqlite   users, builds, streams, flags, and activity
manifests/    immutable build manifests
objects/      content-addressed chunks
Metadata and manifests are small and essential. Chunks are much larger, but may be recoverable from original builds or client caches.
Back up safely
Create a private backup directory once:
sudo install -d -o vsync -g vsync -m 700 /var/backups/vsync
Then snapshot metadata and manifests while the service is running:
vsync_backup_stamp="$(date +%F-%H%M)"
sudo -u vsync vsync-server backup \
  /var/backups/vsync/meta-$vsync_backup_stamp.sqlite
sudo tar -C /var/lib/vsync -czf \
  /var/backups/vsync/manifests-$vsync_backup_stamp.tgz manifests
The backup command writes a consistent snapshot even while the server is
handling traffic, and refuses to overwrite an existing file - date-stamp the
name. Manifest files never change once written, so archiving manifests/
live is also safe. Do not copy meta.sqlite itself: it uses SQLite WAL
mode, and a raw copy of a live database is torn.
Back up objects/ as well when storage and backup bandwidth allow. Keep at
least one backup outside the VPS.
Restore a backup
Test this procedure on a separate server before relying on a backup. For an in-place recovery, stop Vsync and preserve the failed data directory:
sudo systemctl stop vsync-server
sudo mv /var/lib/vsync /var/lib/vsync.before-restore
sudo install -d -o vsync -g vsync -m 750 /var/lib/vsync
sudo install -o vsync -g vsync -m 600 \
  /var/backups/vsync/meta-2026-07-19-1200.sqlite \
  /var/lib/vsync/meta.sqlite
sudo tar -C /var/lib/vsync -xzf \
  /var/backups/vsync/manifests-2026-07-19-1200.tgz
sudo chown -R vsync:vsync /var/lib/vsync
sudo systemctl start vsync-server
curl https://builds.example.com/healthz
Replace the example timestamps with one matching backup set. Restore
objects/ before starting when it was backed up. Without it, the catalog is
restored but builds cannot be fetched until their chunks are recovered from
another backup, an original build, or client caches.
Garbage collection
Preview a sweep:
sudo -u vsync vsync-server gc --dry-run
Run it immediately:
sudo -u vsync vsync-server gc
Garbage collection retains the configured number of newest builds of each stream and platform, pinned builds, and young builds. A grace period prevents newly written files from being collected during an in-flight operation.
The server normally sweeps at startup and once per day. You can also preview or run a sweep from the admin dashboard.
Integrity scrub
Re-hash every stored chunk and manifest and report which builds a bad object leaves broken:
sudo -u vsync vsync-server fsck
This finds bit rot proactively instead of letting it surface as a failed
fetch. A corrupt object is removed, so the server asks for it again during
have-negotiation and the next commit that contains the same content
re-uploads it - damaged builds repair themselves without a restore, as soon
as such a commit happens. --dry-run reports without removing anything.
fsck exits nonzero when it finds any damage and records what it removed in
the activity trail, so a scheduled run (say weekly, via cron or a systemd
timer) doubles as a bit-rot alarm. It reads every chunk once; expect a
disk-bound runtime on large stores. It is safe while the server is running.
Upgrade
Take a metadata backup before every upgrade. Download the new package and install it over the existing version:
sudo apt install ./vsync-server_*-1_amd64.deb
sudo systemctl restart vsync-server
curl https://builds.example.com/healthz
The package preserves /etc/vsync/server.toml and /var/lib/vsync. Database
migrations run when the new server starts. An older server refuses a newer
schema, so downgrading across a migration requires the pre-upgrade metadata
backup.
When a release changes the wire protocol, old and new clients refuse each other and name the side that needs updating. Coordinate that server and client rollout. Transfers interrupted by the restart can be run again; commits are atomic on the server.
Logs
sudo journalctl -u vsync-server -f
The admin activity trail records user-facing events such as logins, commits, fetches, stream changes, reports, pins, token changes, and garbage collection. systemd logs remain the source for startup errors and operational failures.
Server troubleshooting
Service does not start
sudo systemctl status vsync-server
sudo journalctl -u vsync-server -n 100 --no-pager
Common causes are an invalid TOML setting, a root directory the vsync user
cannot write, or another process already listening on the configured address.
Public health check fails
Check each layer separately:
curl http://127.0.0.1:7770/healthz
sudo systemctl status caddy
curl https://builds.example.com/healthz
If the local request works but HTTPS fails, inspect DNS, firewall rules, the Caddy configuration, and Caddy logs.
Uploads fail with request too large
Ensure the reverse proxy accepts bodies up to 256 MB. The Caddy example uses:
request_body {
    max_size 256MB
}
Clients receive 401
- Confirm the token is active with
vsync-server token list. - Check that the client uses the correct server URL.
Client and server protocol mismatch
Vsync refuses incompatible peers instead of guessing. Update the client or server named in the error. For a team-wide protocol change, coordinate both sides as described under Upgrade.
Disk is filling up
Open the admin dashboard to inspect deduplicated store size and free space. Run a GC dry run, review the retention configuration, and only then run the sweep. Check for large backups or unrelated files on the same volume as well.
Database permission errors
The packaged service runs as vsync. The data root and its contents must be
writable by that user. Run server maintenance commands with sudo -u vsync to
avoid creating root-owned files in the data directory.
Admin panel
The admin panel is available at:
https://builds.example.com/admin
The panel is for admins. Sign in with a name and password, or paste a token
value; either way the name needs the admin role, and anyone else is turned
away at the sign-in form. There is no separate admin login. See
Permissions.
Everyone else works through the desktop app or the CLI, where the content
roles (tester, developer, maintainer) decide what they can fetch and
push.
The navigation contains:
- Dashboard: store, free-disk, and active-token cards; games; garbage collection; recent activity.
- Builds: streams and build status, with pinning and stream deletion.
- Users: invite people, reset passwords, and disable accounts.
- Tokens: create, inspect, and revoke service credentials.
- Access: manage role assignments and stream commit allowlists. See Users, tokens, and access.
Session security
The session rides an expiring session token in an HttpOnly, SameSite=Strict
cookie scoped to /admin. The server revalidates it, and the admin role,
on every request. Revoking the name's tokens, disabling the user, or removing
the role signs the browser out immediately.
Always access the panel through HTTPS. Do not paste a session cookie or a raw token in screenshots, chat messages, tickets, or shared shell history.
Dashboard
The dashboard shows:
- Physical deduplicated store size and chunk count.
- Free space on the data volume.
- Number of active tokens.
- Build, stream, and pre-dedup content totals per game.
- Current GC retention policy and the last completed sweep.
- Recent activity with actor, action, game, and details.
Builds and streams
Open Builds and select a game or choose all.
Streams
The streams table shows the game, stream, description, how many builds are in it, and who created it when.
Deleting a stream asks what to do with those builds:
- delete, keep builds: the builds leave the stream and remain, subject to normal retention. Without a stream they are kept only while pinned or young, so confirm that important builds are pinned first.
- delete with its builds: the builds are removed from the metadata now, pinned ones included, and their storage is reclaimed by the next sweep.
Use the desktop or CLI client to create a stream or edit its description. A build's stream is chosen when it is committed and does not change afterwards.
Builds
The builds table shows ID, game, platform, stream, version, size, file count, uploader, age, team feedback, release notes, and individual reports.
Available actions are:
- pin: protect the build from garbage collection.
- unpin: return the build to normal retention rules.
Users report builds as working or broken from the desktop or CLI, optionally with a note. The admin view shows the resulting unreported, working, broken, or mixed status and every report. Pinning protects the build and its chunks; it does not change which stream the build is in.
Users, tokens, and access
People get accounts on Users. Automations get explicit service identities and raw credentials on Tokens. Roles belong to those principals, so issuing or revoking one credential never changes authority.
Invite a person
On Users, enter a login name and optionally an email address, then create the invitation. The link works once and expires after seven days. The person chooses a display name and password.
A password reset replaces pending invitations and signs out password and web sessions created with the old password. Disabling a user blocks sign-in and revokes all of that person's credentials immediately.
Create a service token
On Tokens:
- Enter a descriptive service identity such as
ci-release. - Optionally set an expiry in days.
- Create the token and copy it immediately; it is shown once.
- Store it in the CI secret store.
The name must not belong to a person. Reusing an existing service name creates another credential for the same service principal.
Assign roles
On Access, enter a principal name, choose a role, and optionally set a game, stream, and expiry. Server roles are server-wide. Maintainer roles can cover all games or one game. Tester and developer roles can also cover one stream.
Each exact principal, role, and scope has one row. Assigning it again refreshes that row instead of creating a duplicate. Only admins can assign or revoke roles.
The same page manages stream commit allowlists. * leaves a stream
unprotected. A comma-separated list protects it so only those principals can
commit, and only when they separately hold developer-or-higher access.
See Roles and authentication for the full model.
Revoke credentials or accounts
Choose revoke all next to a service identity on Tokens to invalidate all of its raw credentials. For people, use disable on Users so existing sessions are revoked and another login is blocked in one operation.
Storage and garbage collection
The dashboard reports physical chunk storage after deduplication, free disk space, and pre-dedup content totals per game.
The panel displays retention but does not change it. Edit the server configuration to change retention.
What GC keeps
Garbage collection retains:
- The configured number of newest builds of each stream and platform.
- Pinned builds.
- Builds younger than the configured retention age.
- Files inside the safety grace period.
Everything else may be removed, including chunks no retained build needs. A build that belongs to no stream is kept only while it is pinned or young.
Preview a sweep
Choose dry run. The result reports how many builds and chunks would be removed and how much space would be reclaimed. No data changes.
Run a sweep
After reviewing the dry run, choose run now. The result reports removed and retained data, and the action appears in recent activity.
GC is designed to run while the server is available. Backups are still separate: garbage collection is not a substitute for a tested metadata backup.